Very good article from ax community and important.
Category Performance:
how to run every second batch job in AX 2012
https://community.dynamics.com/ax/f/33/t/221221
Wednesday, February 7, 2018
Thursday, September 11, 2014
Optimize AX 2013 R3 Virtual Machine Solution Demo On Laptop
Table of Contents
Chapter
1
Preface
Who need to read this tutorial.
This tutorial is for all Dynamics AX professional, Technical – Functional – Project manager – Sales manager, who wants to have Dynamics AX 2013 R3 Solution Demo application in a laptop.
This tutorial is for all Dynamics AX professional, Technical – Functional – Project manager – Sales manager, who wants to have Dynamics AX 2013 R3 Solution Demo application in a laptop.
P
rogrammer time to time would like to check how is the standard application class to compare customer’s instance with standard AX before any modification. Consultant need to test some of the standard functionality without using customer data or exploring some functions directly from laptop without remote to office. Or sales manager who want to do preparation for a demo to customer. These are most common example why Dynamics AX professional need this VM in his/her laptop.
Most professional usually download the demo virtual machine from microsoft partner source, and use Vmware, Virtual Box or Hyper-V in their main laptop. Mount the vhd to the virtual machine application and spend three hours to configure the setting before the virtual machine can be used. 
The moment virtual machine is ready then everyone realize his 8 GB RAM can’t run it fast enough. The virtual machine is too slow to do anything. Upgrading to 16 GB RAM is not helping either, the laptop is forced to run two OS at same time. The main OS windows 7/8 and a hungry-resource-virtual-machine Windows server 2012 complete with AOS server, Sharepoint server, SQL server, SQL Server Reporting Service, SQL Server Analytal Service and you name it. Some of these applications are I/O hungry application which is known not running well in virtual environment.
What is the solution?
If you have budget the easier is to upgrade your RAM to 24GB/32GB but I know very limited laptop model in current market can support such upgrade. This RAM upgrade will cost you around 300-500 USD.
Let say most common laptop people have doesn’t support 24GB/32GB, the next option is to buy a super laptop with 32 GB RAM and be prepared to have around 3,000 USD in your pocket.
What is cheaper solution?
Well this is my usually I do to maximize 8GB/16GB hardware to run virtual machine, fast enough to satisfy me. My solution is to setup Dual Boot OS, one for my main OS (Windows 7/8) and another one for Windows Server 2012 to host Dynamics AX 2012 virtual machine.
30 minutes setup time
Yes you read it correctly. It is about 30 minutes to setup. It is how easy this method and why I call it cool trick.
Is it too technical for me?
Fortunately it is easy enough to follow and you don’t have to be a very technical person to do it as long as you follow it step by step.
Chapter
2
Tutorial content
This is the content of tutorial. If you have a question please don’t hesitate to email me at cws@ax-excellence.com
Step 1 Download the material to your harddisk
Download and extract the virtual machine file from partner source, link below:
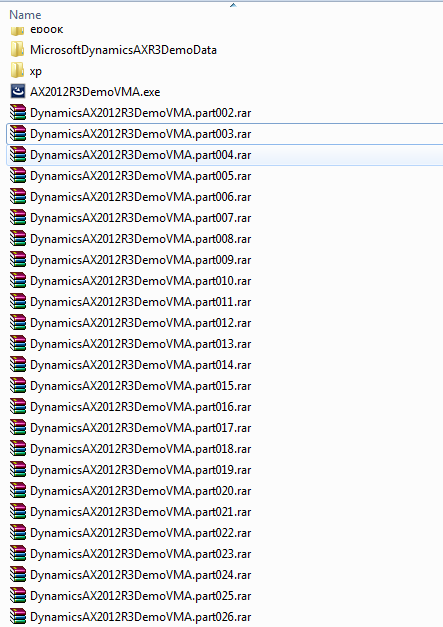
Step 2 Extraction
You will have 26 files from the download page. Extract this into a folder.
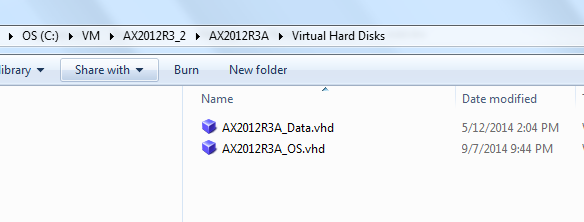
After extraction you should have 2 VHD like below:
Step 3. Attach your VHD to windows 7 from Disk Management
Click Windows>Computer>Right click Manage.

Right click Disk Management>Attach VHD
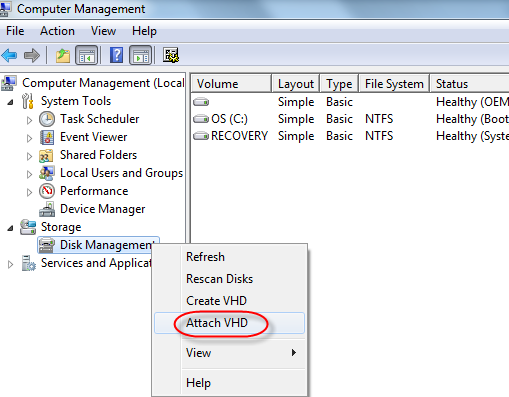
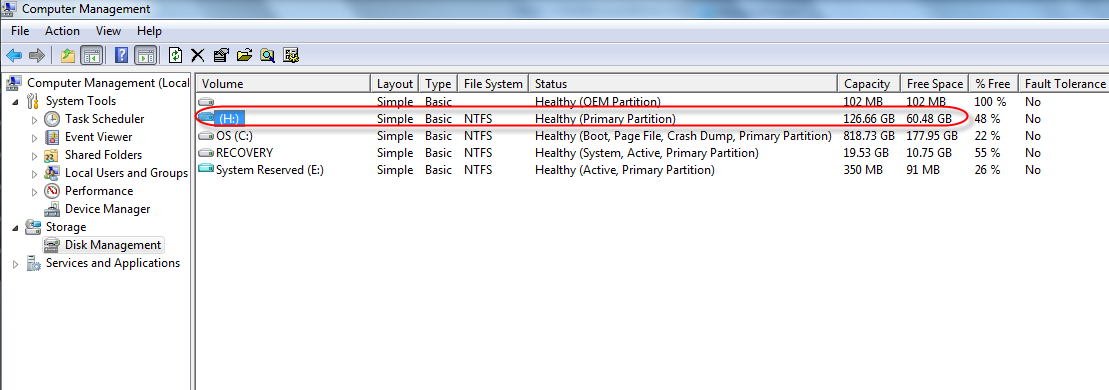
Locate Dynamics AX vhd from previous extraction (AX2012R3A_OS.vhd)

System then will assign new drive letter to the VHD. For my case it is H: drive.
Step 4 Create multiple boot
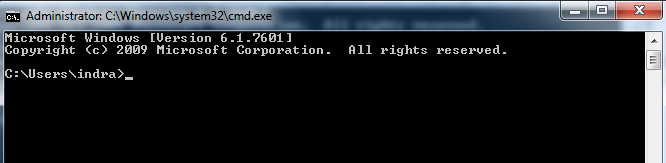
Open command prompt. Click windows>type command on search box>choose command prompt>right click>Open as Administrator.

Following command prompt will appear:
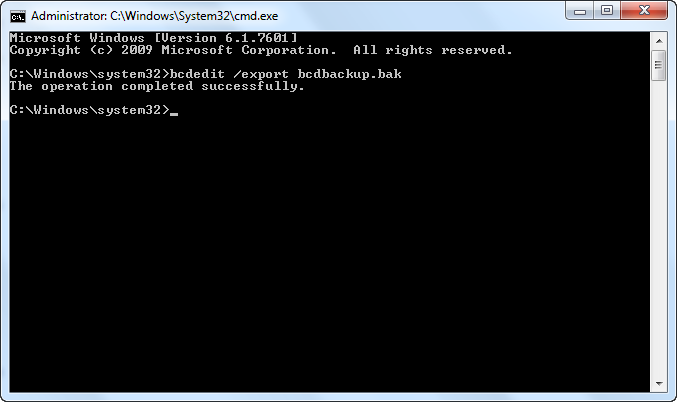
Back up your bootfile with following command (type it and press enter)
bcdedit /export bcdbackup.bak
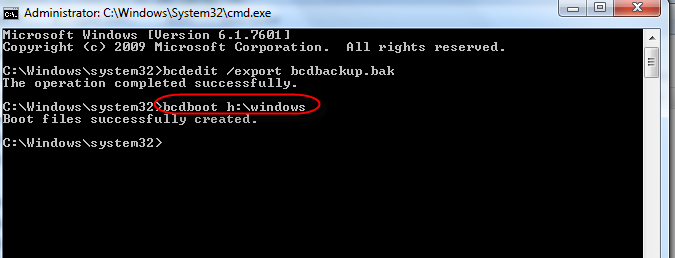
Then now the important part creating the dual boot, enter following command (the H drive depends on the driver letter assigned on previouse step)
Bcdboot H:/windows
When you restart computer you should see boot for Windows 7 and Windows Server 2012
Choose the Windows Server 2012 to start and login with Microsoft demo account:
Username: contoso\administrator
Password: pass@word1
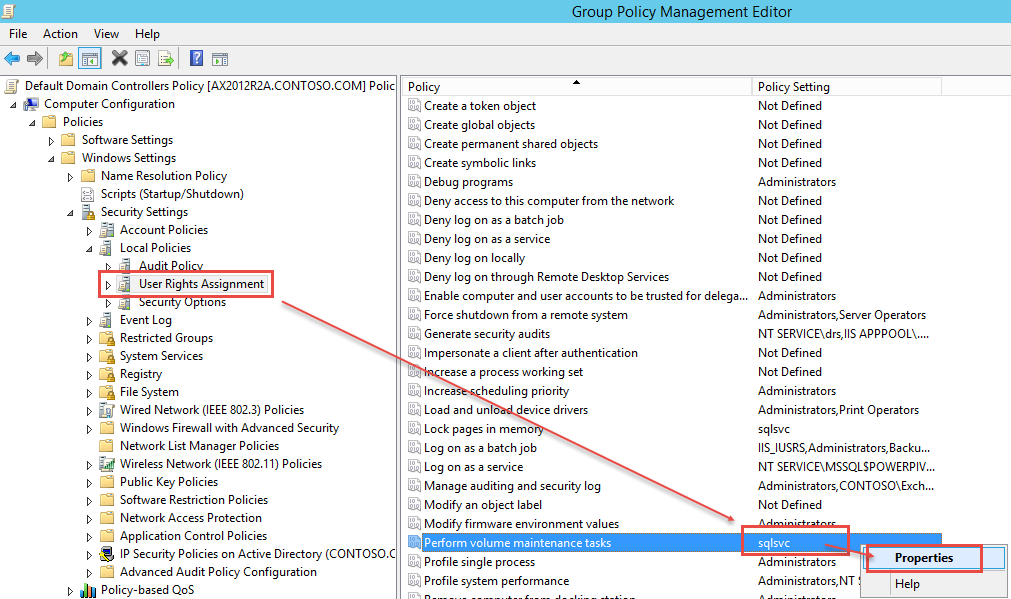
Step 5 Adding Contoso\Administrator to perform volume management
Once you login to Dynamics AX 2012 R3 VM environment, you need to add the admin to perform volume management
This is a bit technical to explain and to simplify my tutorial I don’t want to explain too much on this. but you got to do this.
Go to administrative tools>Open Group policy management
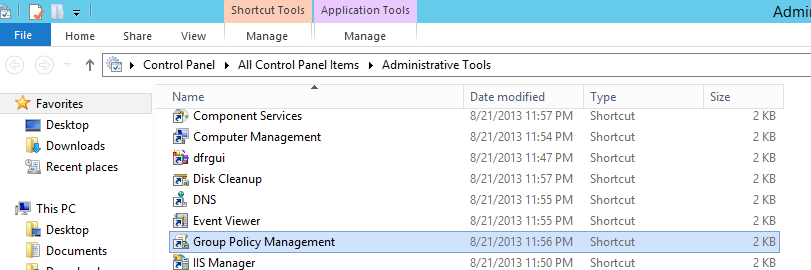
Look for below node, right click edit
On this page find for below node and add Contoso\administrator to it.

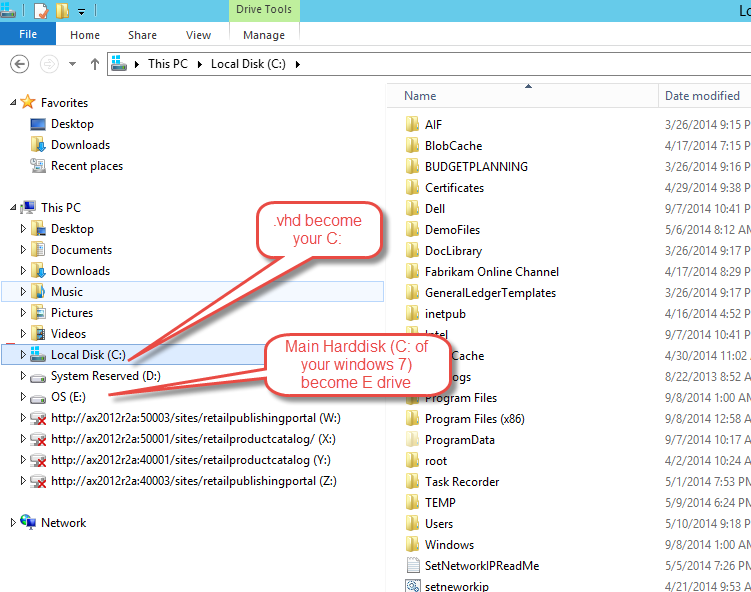
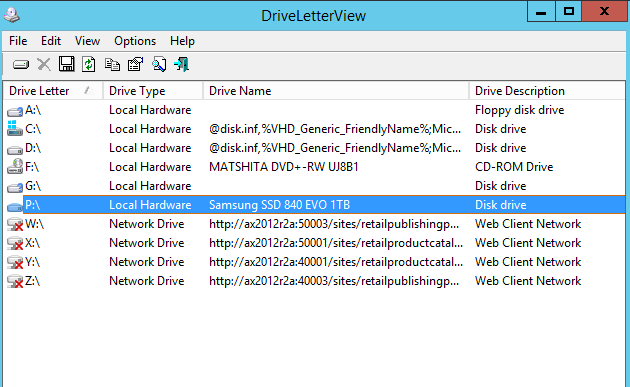
Step 6 Change the Windows 7 OS Drive letter
By default the vhd file become your C: drive and the main disk (C: drive of your windows 7 become E: drive). We need to change this E: drive to something else because we need E: drive for the data for VM.
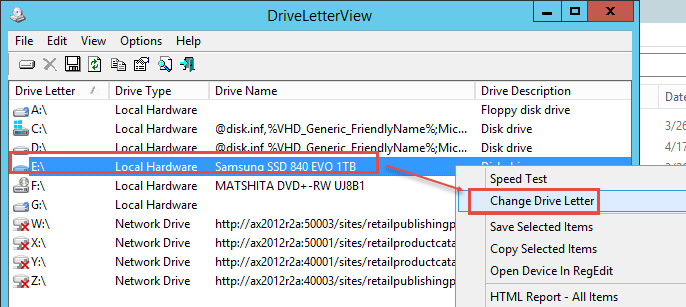
Download a tool and extract to your local drive.
Run it and change your E: drive to P Drive like below:
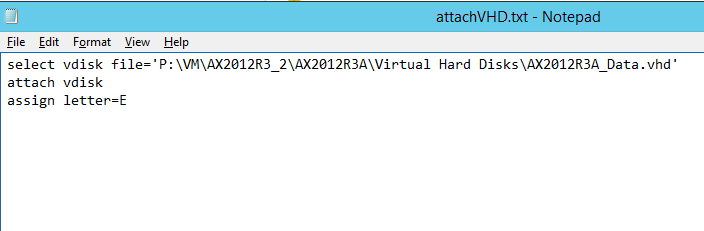
Step 7 Attach the data (2nd Vhd to E: \Drive)
Still remember the 2nd Vhd file AX2012R3A_Data.vhd. Well we need that file now.
Open your notepad, type below (according to your file location) then save it as “attachvhd.txt” and save to your C:\ drive.
select vdisk file='P:\VM\AX2012R3_2\AX2012R3A\Virtual Hard Disks\AX2012R3A_Data.vhd'
attach vdisk
assign letter=E
Create another file and save it as “attachvhd.bat”. Type following inside the file.
diskpart /s "c:\attachvhd.txt"

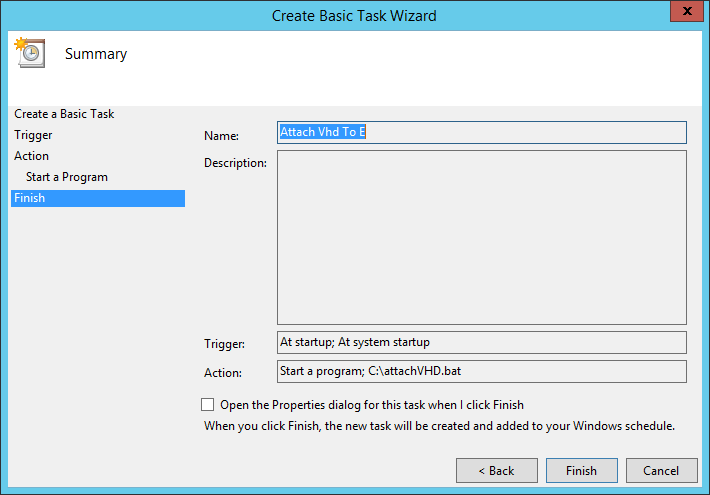
Open your task scheduler and create new task to run AttachVHD.bat after restart:


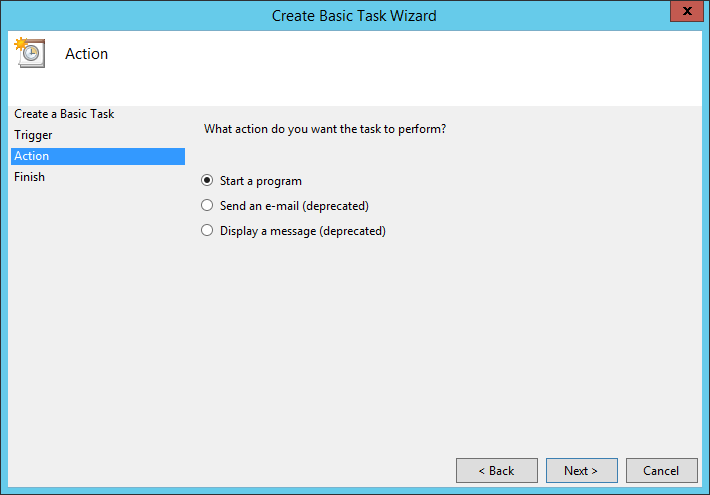
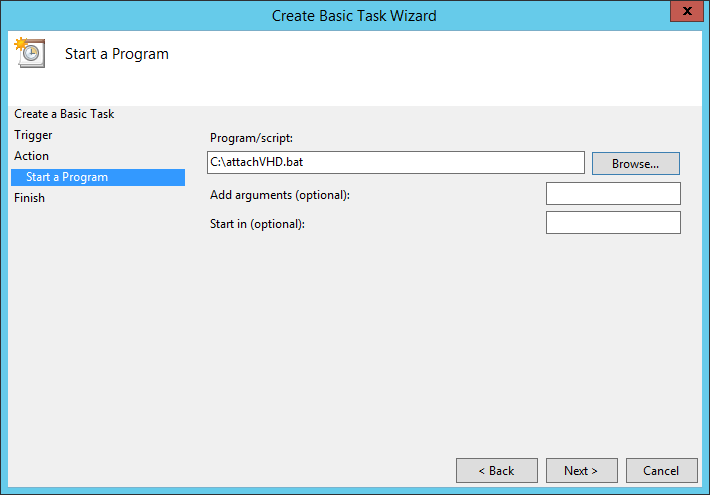
Restart your computer and you are ready to go.
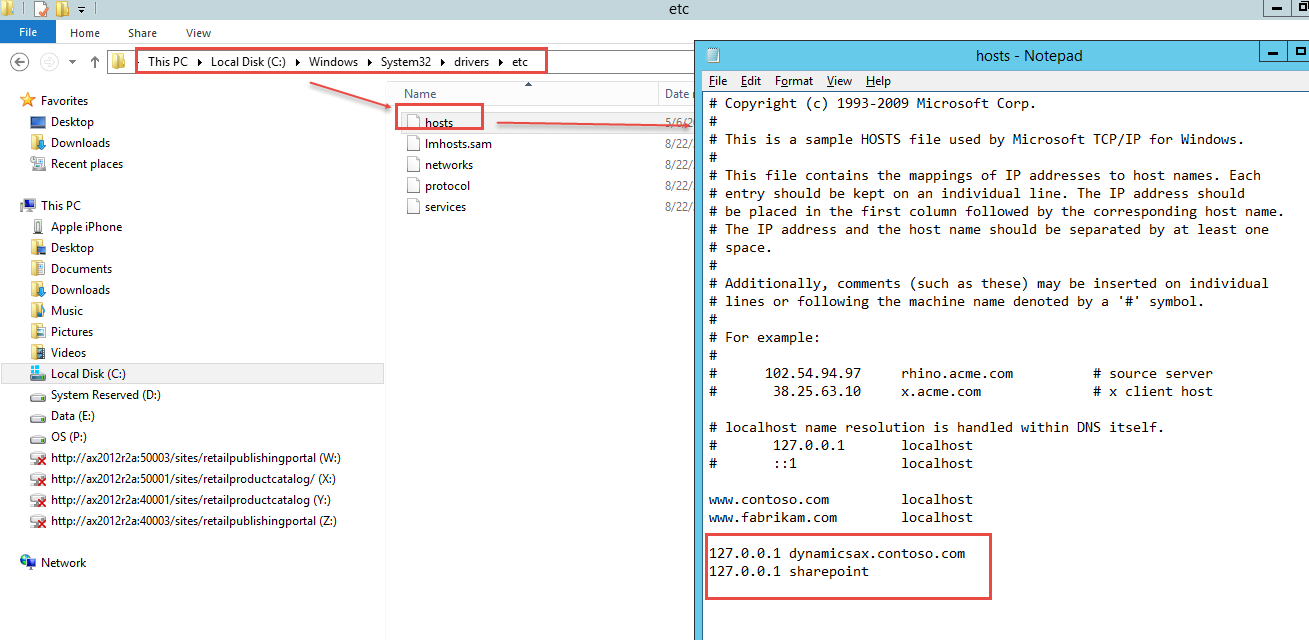
Step 8 Change host file
Dynamics AX enterprise portal won’t work at the moment. To make it work simply add following two lines into your host file:
127.0.0.1 dynamicsax.contoso.com
127.0.0.1 sharepoint
Credit
Chandra Setiawan / Dynamics AX Consultant
Company / AX Excellence Pte. Ltd.
Email / cws@ax-excellence.com
Skype / Chandra.wijaya.setiawan
Thursday, May 22, 2014
Dynamics AX 2012 R3 Change inventory dimension label size, color, style
Changing – Inventory dimension label ‘Color’ label to ‘Length;
Document generation for Task Recorder
|
Recorded by:
|
Chandra
|
|
Recorded date:
|
22/5/2014
|
|
Document created:
|
22/5/2014
|
|
Task notes:
|
|
1. Click Area Page node: Product
information management -> Setup -> Dimension groups -> Product
dimension groups.
Form name: Product dimension groups
Select one of the existing record (for this sample size
and color) then high light “Color” then
click rename button

2. Click the Rename button.
Form name: Microsoft Dynamics AX

3. Change Text from ‘Color’ to 'Length’.


Monday, May 19, 2014
Learning Microsoft Dynamics AX 2012 R3 Warehouse Management and Transport Management Resource (for Partner)
To embrace my new project with handheld device, I need to learn the new module Warehouse management WAX which as standard feature for mobile device.
I would like to share some useful steps/link if you just get started with R3.
I would like to share some useful steps/link if you just get started with R3.
- You can download Microsoft Dynamics AX 2012 Solution Demos here
- I recommend to use dual OS approach if you have limited laptop/PC RAM/CPU. see detail here
- Since R3 is could ready, you can sign up Azure account and deploy your R3 there. Try it and get free 200 USD/1 month credit for trial. This is what our company evaluate as well now to give option and benefit to your potential and existing customer. Here is great blog step by step to setup R3 on Azure in 15 minutes. Click here
- And finally you can go to following link to get some learning material to get started for two new modules. You can jump to below list since it will give you high level understanding in 1 hour.
- Main tutorial link
- Microsoft Dynamics AX 2012 R3 Warehouse Management Hands On Lab 1
Microsoft Dynamics AX 2012 R3 Warehouse Management Hands On Lab 2
Microsoft Dynamics AX 2012 R3 Warehouse Management Hands On Lab 3
Microsoft Dynamics AX 2012 R3 Warehouse Management Hands On Lab 4
Microsoft Dynamics AX 2012 R3 WMSTMS Workshop – Accessorial Charges Setup
Microsoft Dynamics AX 2012 R3 WMSTMS Workshop – Carrier Setup
Microsoft Dynamics AX 2012 R3 WMSTMS Workshop – Freight Reconciliation
Microsoft Dynamics AX 2012 R3 WMSTMS Workshop – Inbound and Outbound Planning
Saturday, March 15, 2014
AX 2012 R2 CU7 Sample India TDS Setup for 194C Contract for company with threshold and accumulative
In this example following is real scenario to setup TDS 194C for contract (company) in year 2014:
- If PAN status is "not available" or "not received" yet then the TDS rate is 20% . See sample A below.
- If PAN status is "Received" then
- If single invoice more than 30,000 Rs then TDS rate is 2% . See sample B below.
- If single invoice less than 30,000 Rs then calculate cumulative invoice amount within current fiscal year for the vendor.
- If cumulative is <=75,000 Rs per annum then TDS rate is 0%. See sample C below.
- If cumulative is > 75,000 Rs per annum then TDS rate is 2%. Note the first invoice which make the cumulative reach threshold of 75K, will recalculate TDS for previous non-taxed invoices. (See sample D below)
Sample A:

8 Jan 2014 there is invoice INV001 1000 Rs. So the rate for TDS should be 20% * 700 = 140 Rs.
Sample B:

8 Jan 2014 Invoice# INV002, amount 32,000.00 Rs. TDS tax amount = 2% * 32,000 = 640 Rs
Sample C & D:
Vendor AXE0001, PAN information status is "Received".1st Jan 2014 Invoice# INV003, amount 10,000.00 Rs. TDS tax amount = 0% * 10,000 = 0 Rs (10K p.a.)
2nd Jan 2014 Invoice# INV004, amount 20,000.00 Rs. TDS tax amount = 0% * 20,000 = 0 Rs.(30K p.a.)
3rd Jan 2014 Invoice# INV005, amount 25,000.00 Rs. TDS tax amount = 0% * 25,000 = 0 Rs.(55K p.a.)
4th Jan 2014 Invoice# INV006, amount 25,000.00 Rs. TDS tax amount = 2% * 80,000 = 1600 Rs (80K p.a.)
5th Jan 2014 Invoice# INV007, amount 20,000,00 Rs. TDS tax amount = 2% * 20,000 = 400 Rs (100 p.a.)
TDS Setup for 194C Contract Company step by step :
If you don't understand this steps, refer to following msdn:
1. GL parameter>Activate TDS

2. GL>set up>Withholding tax>India>Withholding tax component group

3. GL>set up>Withholding tax>India>Withholding tax component

4. GL>set up>Witholding tax code

4.1 GL>Set up>Threshold definition
Create structure like below for 2014.

4.2. GL>Set up>Withholding tax code>>Threshold reference button>>Designer button.


5. GL>Set up>Withholding tax group

5.1 GL> Set up >Withholding tax group>>Designer button

6. AP>All vendor>>Invoice and delivery tab>>Tick calculate TDS and TDS group.

Any question?
Didn't manage to have correct value?
Having problem with setting up concession tax?
Email me and i would love to help.
Subscribe to:
Posts (Atom)